Initially from: https://github.com/furrtek/portapack-havoc/wiki/Close-Call
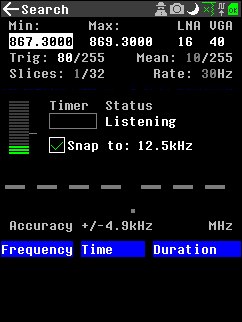
The Search app is similar in functionality found on many Uniden scanners. It allows to define a frequency range to scan (min/max), and a power threshold. If a signal appears above the RF signal threshold for a sufficient amount of time, the signal's frequency is "locked", shown in green on the main display and logged in a table at the bottom of the screen. Unfortunately, it does not allow you to listen to the call or jump to the say the audio App screen with the selected call frequency. You need to manually note the frequency and then place it in another App to listen to the frequency. The Speed of scanning is based the frequency range set. The frequency range if larger than 2.5 MHz will be split in to slices that are scanned. The scan time significantly increase when you have multiple slices.
The Key Items on the App that can be selected with the cursor and changed with the encoder knob are:
- Title bar: The usual Items may be changed and displayed.
- Min: The minimum frequency. The minimum and maximum frequency are held in persistent memory and are available o return to the App.
- Max: The maximum frequency. Regardless of setting of the frequency settings the scan of the frequency spectrum is a minimum of 2.5MHz or multiple slices up to a maximum of 32 (80MHz).
- LNA: The LNA(IF) (0-40).
- VGA: VGA (Baseband Gain) (0-62). Note there is no RF AMP gain setting and is set at 0dB.
- Trig: Alter the Threshold setting (0-255) for the recording of the signal.
- Snap to: Enable to set to record the frequency to the nearest 12.5kHz.
The display information Items are:
- Mean: This is the mean signal level received, the Trigger level need to be set above this level.
- Slices: The number of “Slices” of the frequency scan range that is to be covered. The maximum is 32 i.e., 80MHz.
- Rate: the scanning rate.
- Timer: A bar showing the timer counting down.
- Status: Showing what the App is currently doing” Listening”, “Locked”, “Out of range”. The “Out of range” indication is shown when a frequency is found that meets the threshold conditions but is outside the frequency range selected and will be shown as light grey in the “Dashed lines” display.
- Dashed lines: These are where the detected frequency is displayed and shows initially grey and when reached the timer threshold then turns green.
- Frequency Time Duration Log: This is where a detected and locked frequency is logged and display. The logged items can be selected with cursor/ encoder Knob. This then displays the frequency pad where the frequency can be Loaded, saved to a file for example called “Calls” in the SD card. On return it then goes to the “Min:” frequency at the top of the App.
Items that could be improved in the App are:
- The ability to link from the log selection in the log to the Audio Listening App and be able to listen to the audio of the call.
- Select the actual frequency range not in 2.5MHz slices.
This file contains Unicode characters that might be confused with other characters. If you think that this is intentional, you can safely ignore this warning. Use the Escape button to reveal them.
How to collaborate
How to ask questions correctly
User manual
- First steps
- Usage cautions
- Intended use and Legality
- Features
- PortaPack Versions (which one to buy)
- HackRF Versions
- Firmware update procedure
- Description of the hardware
- User interface
- Powering the PortaPack
- Troubleshooting
- Won't boot
- Config Menu
- Firmware upgrade
- Diagnose firmware update in Windows
- Receive Quality Issues
- No TX/RX
- TX Carrier Only
- H2+ speaker modifications
- Dead Coin Cell Battery
- Factory Defaults
- SD card not recognized by PC with the SD-card over USB selected
- DFU overlay
- Full reset
- SolveBoard
- How to Format SDCard
- What if I don't like some of the apps
- Applications
Misc
Developer Manual
- Compilation of the firmware
- Compile on WSL with ninja
- How to compile on Windows faster with WSL 2
- Using Docker and Kitematic
- Docker command-line reference
- Using Buddyworks and other CI platforms
- Notes for Buddy.Works (and other CI platforms)
- Using ARM on Debian host
- All in one script for ARM on Debian host
- Compile on Arch based distro (exclude Asahi)
- Dev build versions
- Notes About ccache
- Create a custom map
- Code formatting
- PR process
- Description of the Structure
- Software Dev Guides
- Tools
- Research
- UI Screenshots
- Maintaining
- Creating a prod/stable release (Maintainers only)
- Maintaining rules
- Development States Notes
Hardware Hacks
Note
The wiki is incomplete. Please add content and collaborate.
Important
- This is a public wiki. Everything is visible to everyone. Don't use it for personal notes.
- Avoid linking to external tutorials/articles; they may become outdated or contain false information.
